Building and Flying Related Boards › miniMax, Hi-Max, and AirBike General Discussions
Aileron Construction V Max wing
10 posts
JGlassFNPJuly 20, 2019, 2:55pm
Does anyone have pics of their aileron construction before the plywood was added , like how you did the small half circle pieces that acts as the front ribs that the thin plywood goes over. Also any pics of the d section construction from rib attachments before plywood skins just want to make sure I am doing this correctly. Thanks a bunch
mullacharjakJuly 21, 2019, 10:29am
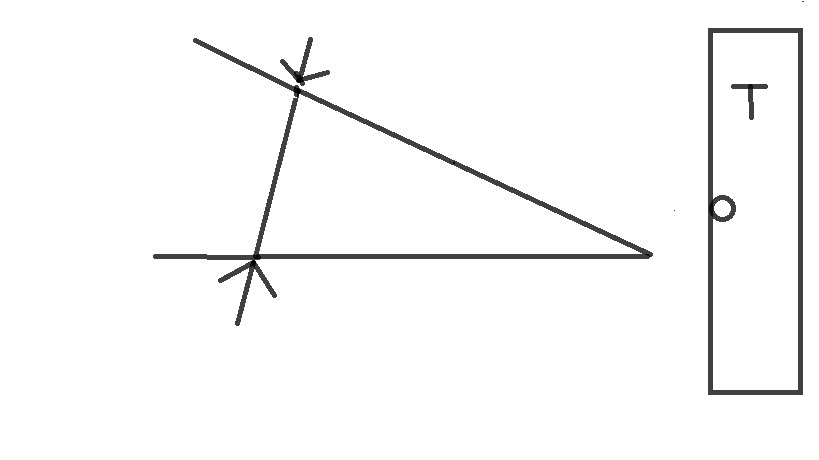
Havent built a minimax yet but I think you can use an adjustable hole cutter to cut the circle on a 1 3/4 R. Better still measure the distance
between the arrows and adjust the hole cutter. Next use the template T made from alum strip to mark the cut line.
Correction: The template may be dispensed with and a straight edge would seem to be ok against a 1/4 bolt.
TomJuly 21, 2019, 12:05pm
Actually this should be very simple. Make a template using a pencil compass cutting out on the bandsaw with a very narrow blade and fine teeth. Cut to the outside of the line, sand to the line. Use the smallest possible dots of Gougeon's 5 minute epoxy, or any weak glue, to glue together a stack of plywood pieces. Trace the template onto the top of the stack and cut it out on the band saw, cutting to the outside of the line. Sand the stack to perfect shape and then pry the pieces apart.
Of course these days you'll want to check if you are buying a wing kit as the parts may be provided laser cut, which will be a huge labor savings.
Tom
JGlassFNPJuly 21, 2019, 2:50pm
I have the ribs cut per template in plans all are exact did them in a stack, I was wondering about how they attach with enough skin to secure behind them, like the aileron spar, it says to cut pieces and glue between the lengths of the aileron ribs basically building up the spar but are the lengths on the back of spar or front in between after half circled are barely tacked to the small rib pieces left over once cut away from the wing? anyone have pics? Thanks again, James
mullacharjakJuly 21, 2019, 8:03pm
I havent built a minimax so dont have any pictures or experience but would like to explain as I understand through rough diagrams.
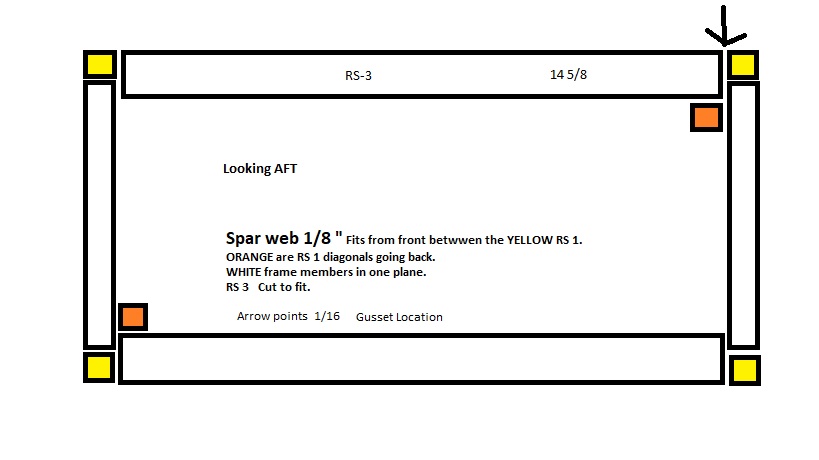
There are 18 1/8" ribs. All of them attach to the sides of RS 1 "small rib pieces left over once cut away from the wing" that you are talking about on ribs 12346789 and 10.
There are 12 1/4 " nose ribs. 10 of them fit within the plane of RS 1 or inside the small rib pieces left over at the front of aileron you have
mentioned. These are ribs # 4 7 5 root and tip.Therefore these 10 ribs need trimming.
The remaining 2 1/4" ribs dont need trimming and attach at rib station 5A.
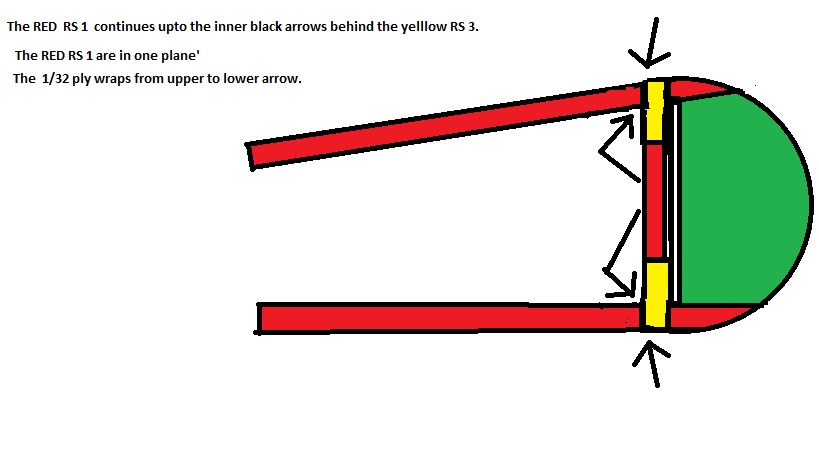
The 1/32 ply skin just wraps around.
RS 3 is behind spar web.Cut to fit.
In the side view 1/16 ply gusset seperating RS1 and RS3 not shown.
Side view shows the trimmed 1/4" ply rib. 1/8" ribs are not trimmed and fit outside RS1 and neither is 1/4" rib 5A where there is no RS1.
JGlassFNPJuly 23, 2019, 12:10pm
Awesome, good instructions, I appreciate it...
MickvdsJuly 24, 2019, 1:28am
Gday JGlassFNP.
I'm currently working on my aileron for my Himax and posted up some photos in another thread. These may be helpfull/interesting for you.
Cheers, Mick
JGlassFNPAugust 5, 2019, 1:42pm
thanks Mick, will check them out now.
aeronutAugust 5, 2019, 2:11pm
You can make very accurate parts using a router and a bit for trimming counter tops. Make a very accurate part and use it for a template to form the remaining pieces. I did all the nose ribs for the wings in this way. It helps to have a router table.
never surrender; never give-up
TomAugust 5, 2019, 11:16pm
While I described above using a bandsaw on the stack of pieces Aeronut is quite correct that a router table with a straight bit with a roller to go against the pattern is the absolutely perfect way to make really perfect pieces. My way is more of a "production" version, but it may only be more appropriate for a really experienced wood worker. The router table way is probably better for a great many people.
Tom